Free-Standing Mexican Tiled Fountain

 Make your own fountain using recycled cardboard: 


For a free-standing fountain you can display wherever you want, cut a back out of two pieces of cardboard in whatever shape you like.  I used the large arch template available here.  For strength, cut one back piece with the cardboard corrugation going sideways, and one with the corrugation going up and down.  Glue the two back pieces together and set aside to dry.

Cut a base for your fountain out of cardboard.  For a rounded base, I traced this jar lid, but you could easily make a square base using a tissue box.  Make whatever shape you want!

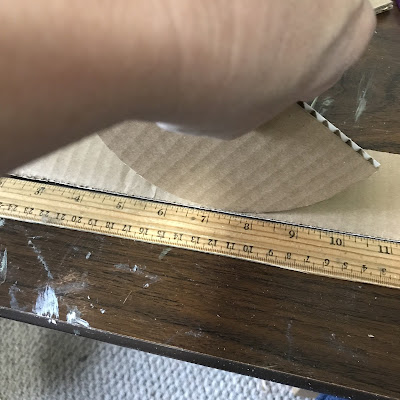
Roll your semi-circle along a ruler to see how wide a rectangle you'll need to cut from cardboard to form the wall of the fountain pool.  Add a half inch to the length to give some slack.  
I cut my fountain wall 2.25" high based on a doll chair because I want my dolls to be able to sit on it.  If you have a lot of long-legged dolls like Integrity dolls, you can make your cardboard rectangle taller.  
(If you are using the semi-circle template, your rectangle will be 11.5" x 2.25", just like mine.)


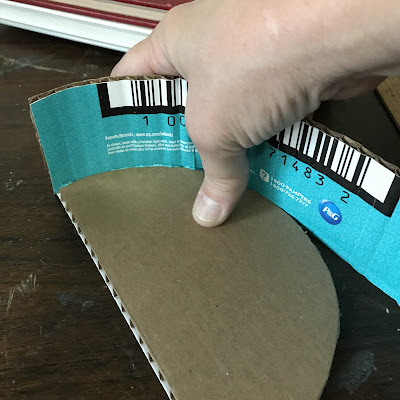
Once you've determined the width and height of your cardboard rectangle, cut it out of cardboard with the corrugation facing the same way as my photo above.  Run the cardboard back and forth over a table edge, as shown, so it will bend around your semi-circle fountain base.

Glue the rectangle to the base.  I used hot melt glue, gluing a few inches at a time, and pressing the wall tightly to the base until the glue dried.


Glue the fountain pool to the back of the fountain.  (No photo.) Cut the walls of the pool flush with the base, if needed, so the whole pool fits snugly against the back. 

Apply paper mache to the top edge of the fountain pool.  You don't need to do the back wall of the pool as that will be covered by water-
patterned printable paper.  (I forgot this fact and put paper mache there by mistake.)
Note:  in the photo above, there is a second wall inside the pool.  This was my mistake.  You will install a second wall later, covered with patterned paper to look like the pool is filled with water.

Cut a top ledge for your fountain pool.  Trace the base of your fountain and sketch a line slightly inside the base.  Then sketch a line slightly outside the base.   Cut out on the two lines you sketched, test the fit, and adjust as needed.  
(Or just use the template if you're making the same shape fountain as I did.)
Cut two edge pieces from cardboard if you want a thicker edge.  I made one fountain with a single layer and one with a double layer and both look fine;  it just depends on your own preference!

Cover the top ledge with paper mache to cover the raw edges of the cardboard.
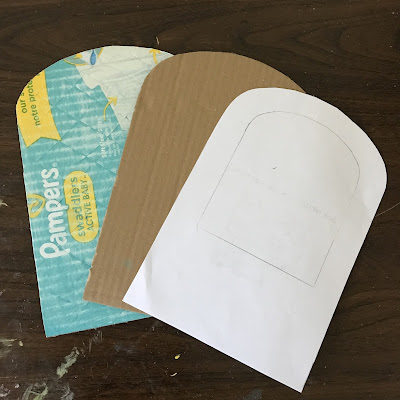
 

With the pool ledge separate from the pool itself, it will be possible to line the pool with water-patterned paper, paint the top edge of the pool wall, and install the plastic "water" surface and decorations!  I made my first fountain with the top ledge attached and had to take it apart to get the water fitted inside the pool.
Ignore the water-patterned paper in the photo above.  You will put that in later, after the fountain is painted.

Next, create one or more tiers, if desired.  I made the single tier above out of a large paper towel roll I got from where I work.  I cut a ledge for the tier out of cardboard, just like the bottom pool of the fountain.   Glue the tier to the back of the fountain and cover everything with paper mache, or...

You may want to make one or more tiers out of recycled plastic objects instead.  You could use a pudding cup, part of a soda bottle, plastic Easter eggs, etc.  Whatever you can imagine!

I decided to use two sizes of Easter eggs to make two tiers.  I marked off half with tape and cut them with a dremel tool.

Lay out your tiers on the back of the fountain and mark where you want them to be.  Trace around the sides and bottom of each item.
Cut out with a box cutter/craft blade.

You could paint the plastic items with spray paint and
glue them in place with hot melt or super glue, or...

Cover with tissue paper.  Paint the inside of the egg with Mod Podge and glue a piece of tissue paper inside, so it overlaps on all sides.  Note that the tissue won't permanently stick to the plastic, but it will stick to the paper mache enough to hold the plastic in place.


Put Mod Podge on/in the cut-out and...


Press the plastic item into it.


Using a brush and Mod Podge, glue the tissue paper on the sides and bottom of the item to the back of the fountain.  Take the tissue paper on the top of the item and fold it down over the front of the item and glue it.  

(Note that the water-patterned paper in the photos is NOT glued on the pool yet!  There is a lot of painting to be done before gluing on any decorative paper.)


Glue more tissue paper over any exposed plastic.  Remember, the glue won't permanently stick to the plastic, so bridge over the exposed plastic with tissue paper: in other words, glue paper to paper.

If the tissue paper on the back of the fountain is too wrinkled, or if you just don't like how it looks, cover with more brown paper (or whatever type of paper you're using for your paper mache.)


I opted to spray paint the "stone" sections of my fountain with textured stone-look spray paint.  I assembled the fountain first and then covered the areas I didn't want painted.  You will find it much easier to spray paint FIRST and glue your fountain pieces together second!


Above:  one of many inspiration photos!


Once your fountain is painted to your liking, you can finally glue water-patterned scrapbook or printable paper into the pool.  Cut a piece of cardboard just like the pool wall you made earlier, but cut it to the height you want your water level to be.  Bend on the corrugation lines just like you bent the pool wall earlier. 

Cover this inner wall with scrapbook paper or a free printable, and glue inside the pool.  I used a glue stick and a free printable from My Froggy Stuff, available here


You could make an inner wall on the back of the fountain, but I opted to just glue paper directly to the back. 

I learned how to make the fountain pool by watching a My Froggy Stuff video.  You will find it very helpful both for building the inner pool walls and for making the surface of the "water" and the "waterfalls" from the upper tiers.  The relevant instructions start at about 1:20.

Doll Pool 2 by My Froggy Stuff


You may also want to put "water" in your upper tiers, depending on their size.  I originally intended to fill the top tier with plants and only put "water" in the middle tier.  I glued some crumpled paper into the middle tier to support the printable, which I glued onto a scrap piece of cardboard.


It wasn't hard to fill the tiers with scrapbook paper water, so I ended up doing both.  Notice the moss in the bottom of the pool.  Glue any decorations you want under the water surface into your pool now, before you place the plastic "water" on top of the pool.


Cut a piece of clear plastic from recycled packaging to fit inside the pool.  It will sit on top of the inner wall of cardboard you built inside the pool.  I opted to color mine.  The video linked up above shows how to color on the plastic using Mod Podge and washable marker.  The relevant instructions start around 2:36.


Instead of building an inner wall against the back of the fountain, I ran a line of hot melt glue at the water level and let it dry.  The line of glue will be almost invisible, but it will hold up the plastic water surface.


I took the above photo with the flash on to show the line of glue along the back of the fountain, the moss glued to the bottom of the fountain, and the plastic water surface glued on top of my very messy inner fountain pool wall.  Yours will look much better!


I wanted to limit the amount of hot melt glue I used for this project since it would be traveling by mail.  I wasn't sure if the hot melt glue would last if exposed to summer heat.  I used this Ultra Gel Control Super Glue and glued some clear glass seed beads to look like water bubbles.  The beads help hold the plastic in place.


I cut strips of recycled plastic packaging and painted them with Mod Podge tinted blue for falling water.  Admittedly, I used a little too much blue.  I glued the falling water to the top tiers, gluing just the top of the strip of plastic.  You could use hot melt glue or use Gel Control super glue like I did.  
I used super glue to attach plastic plants inside the top tiers and around the fountain pool.  I used Elmer's (white PVA) glue to add some natural moss.
In the photo above, you can see some of the plastic plants being clamped with clothes pins while the glue dries.


I glued more clear glass seed beads to the water surface where the "falling water" touched the surface of the pool.  The beads help hold the plastic in place.  


When all the decorations were in place, I glued the ledge on top of the pool wall with Elmer's glue.


I want to add a "stone" "carving" on the back of this fountain above the top tier.  I also plan to add miniature "Talavera" tiles to these fountains.  
The white on the surface of the water in the photo above is light reflecting off the surface.


Comments

Popular posts from this blog

Season 1, Episode 1: A Long Way from Home

The Scrapbook: An Unauthorized Riverforest Bends Fanfic

Lunar New Year